Week by week
You will find the course announcements and daily activities here.
Week 0 : Sept 22 - 28
Week 1 : Sept 29 - Oct 5
Week 2 : Oct 6 - Oct 12
Week 3 : Oct 13 - Oct 19
Class 6 (Tuesday)
- Covered conda environments notes on the workbench and slides.
- Set up VSCode to work on personal computers, without the course conda environment.
Create a
MEDS/EDS-220directory in your personal computer.Open VSCode.
Add a new bash terminal in it.
Confirm git installation by running
git versionin the terminal. If git is installed you will get something similar to
git version 2.33.1If you don’t get a similar output, install git by following the MEDS installation guide.
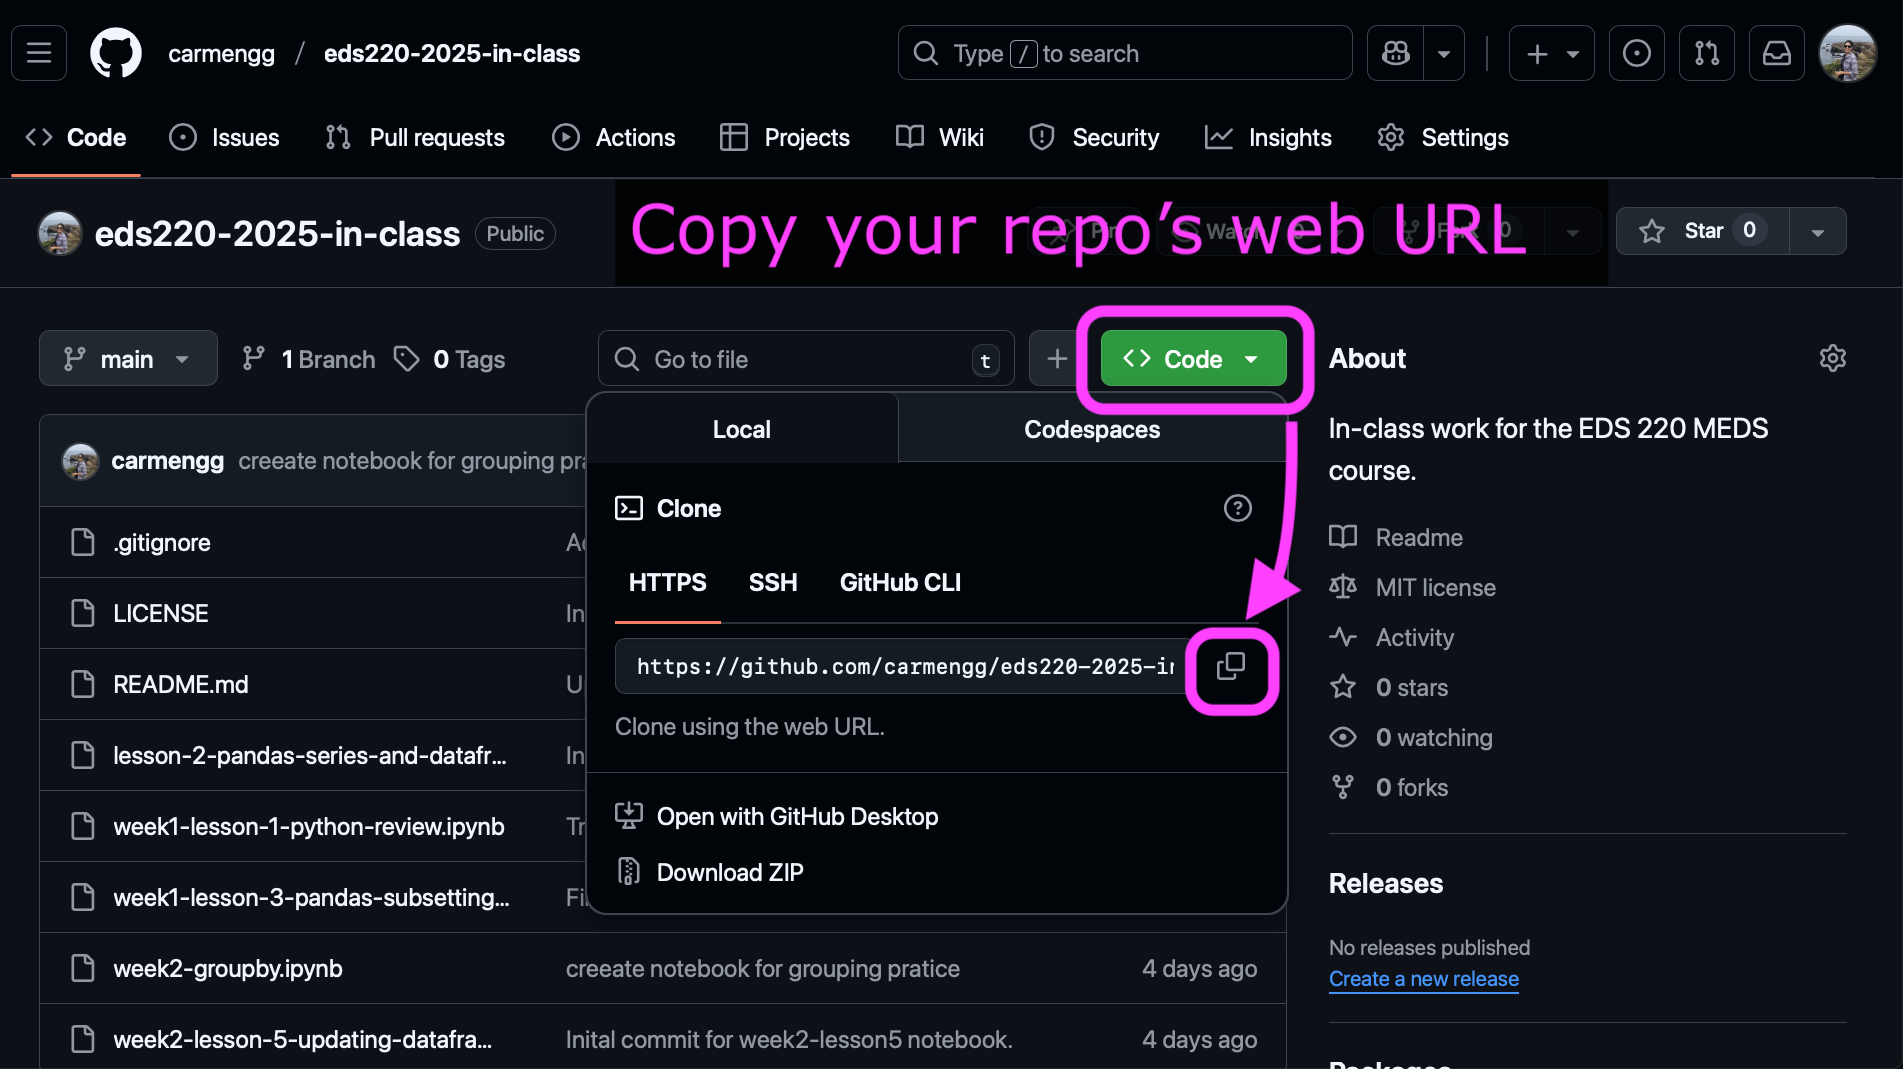
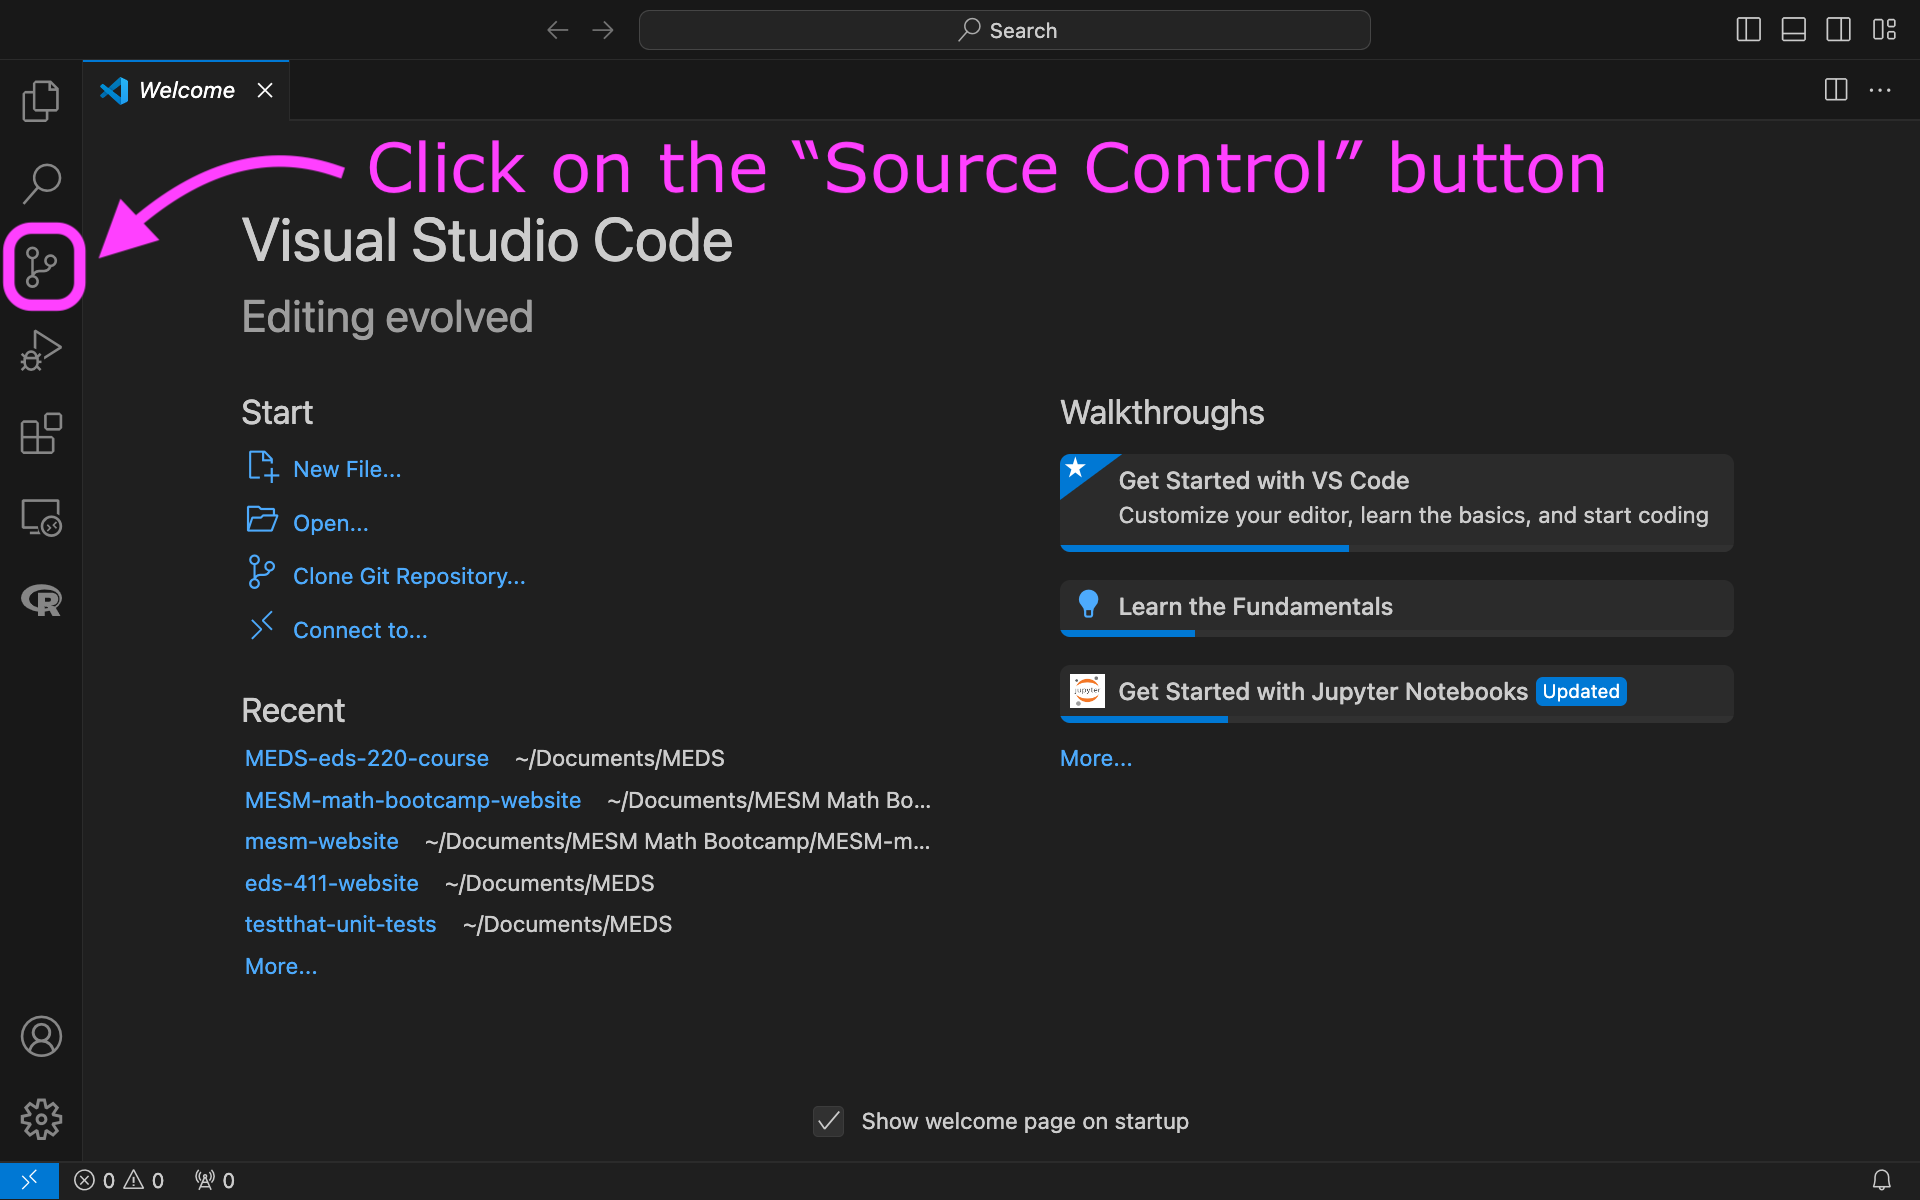
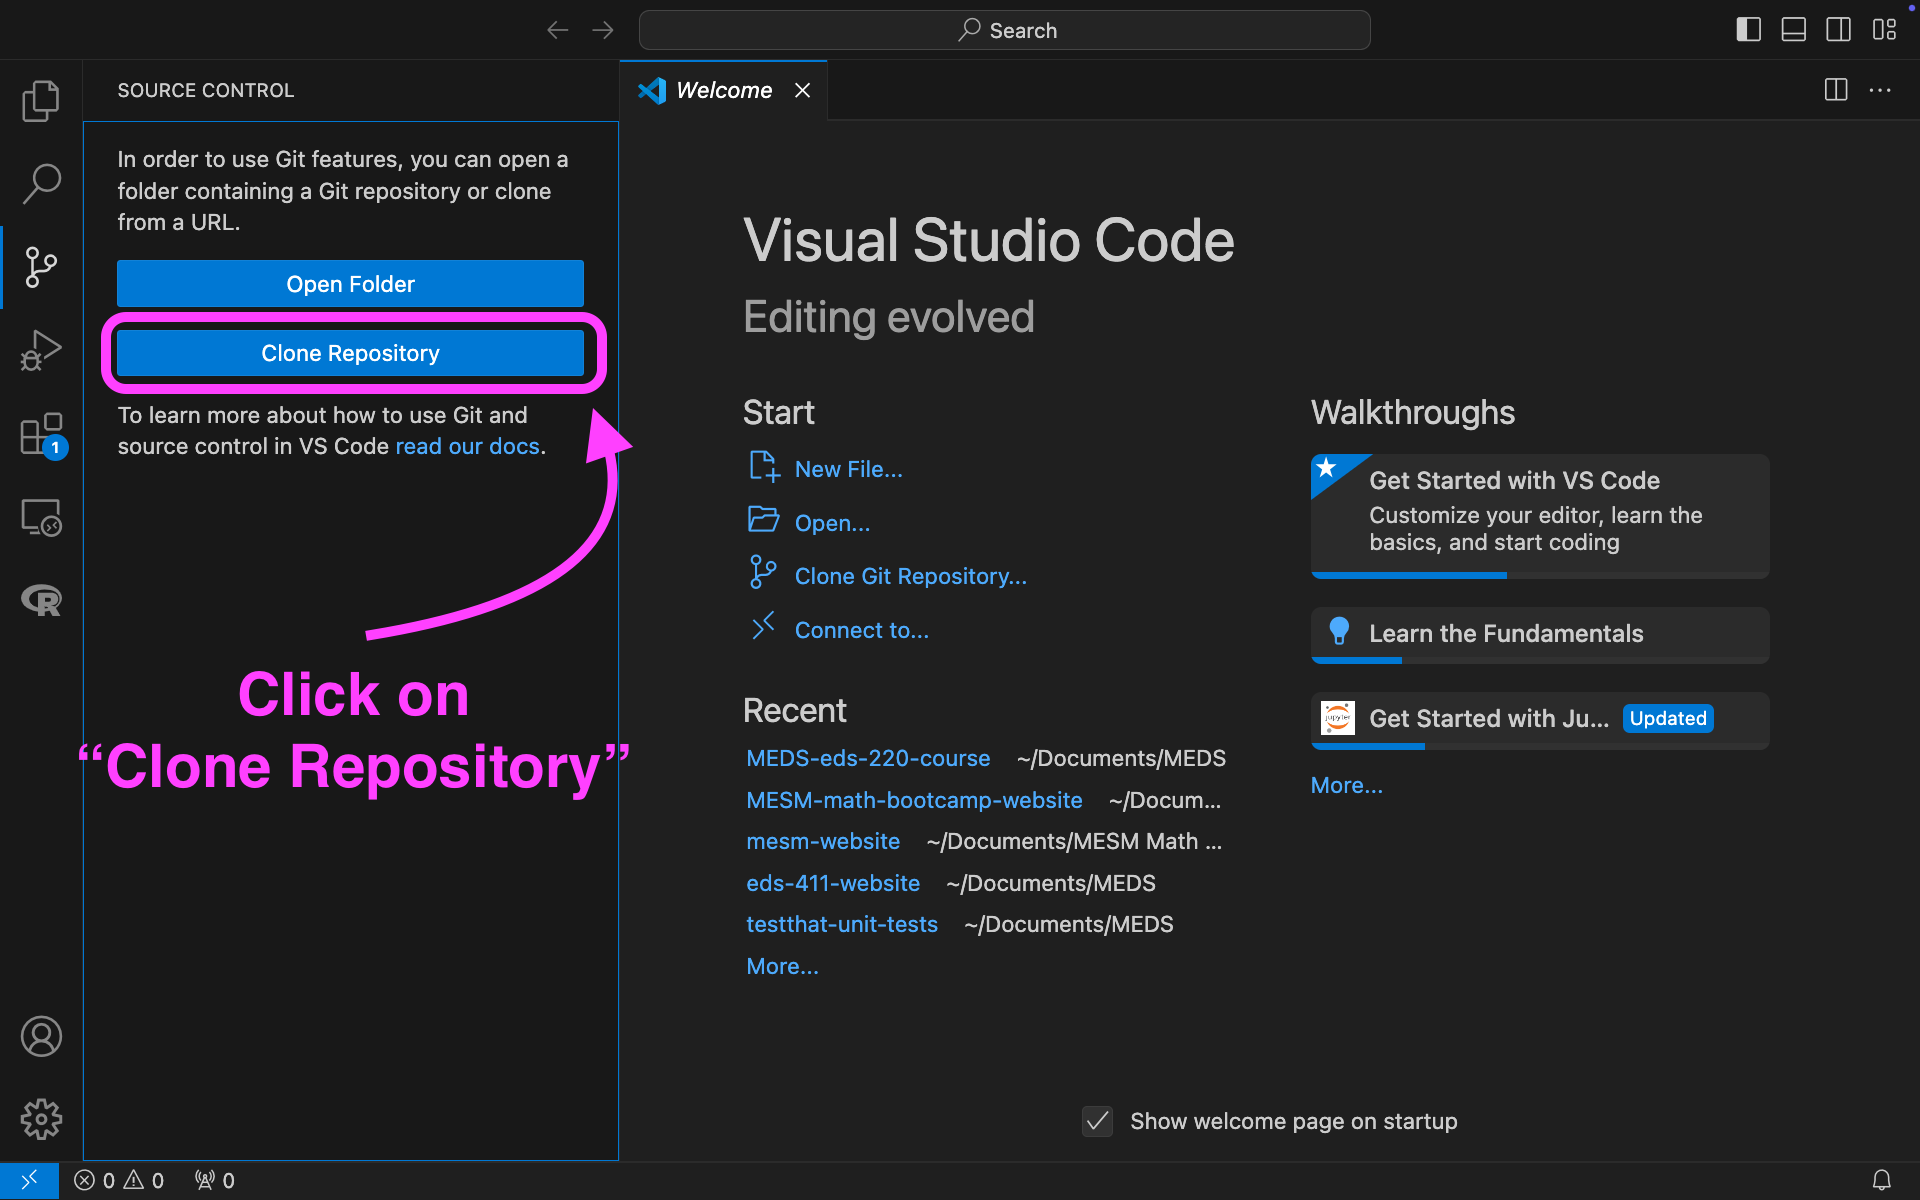
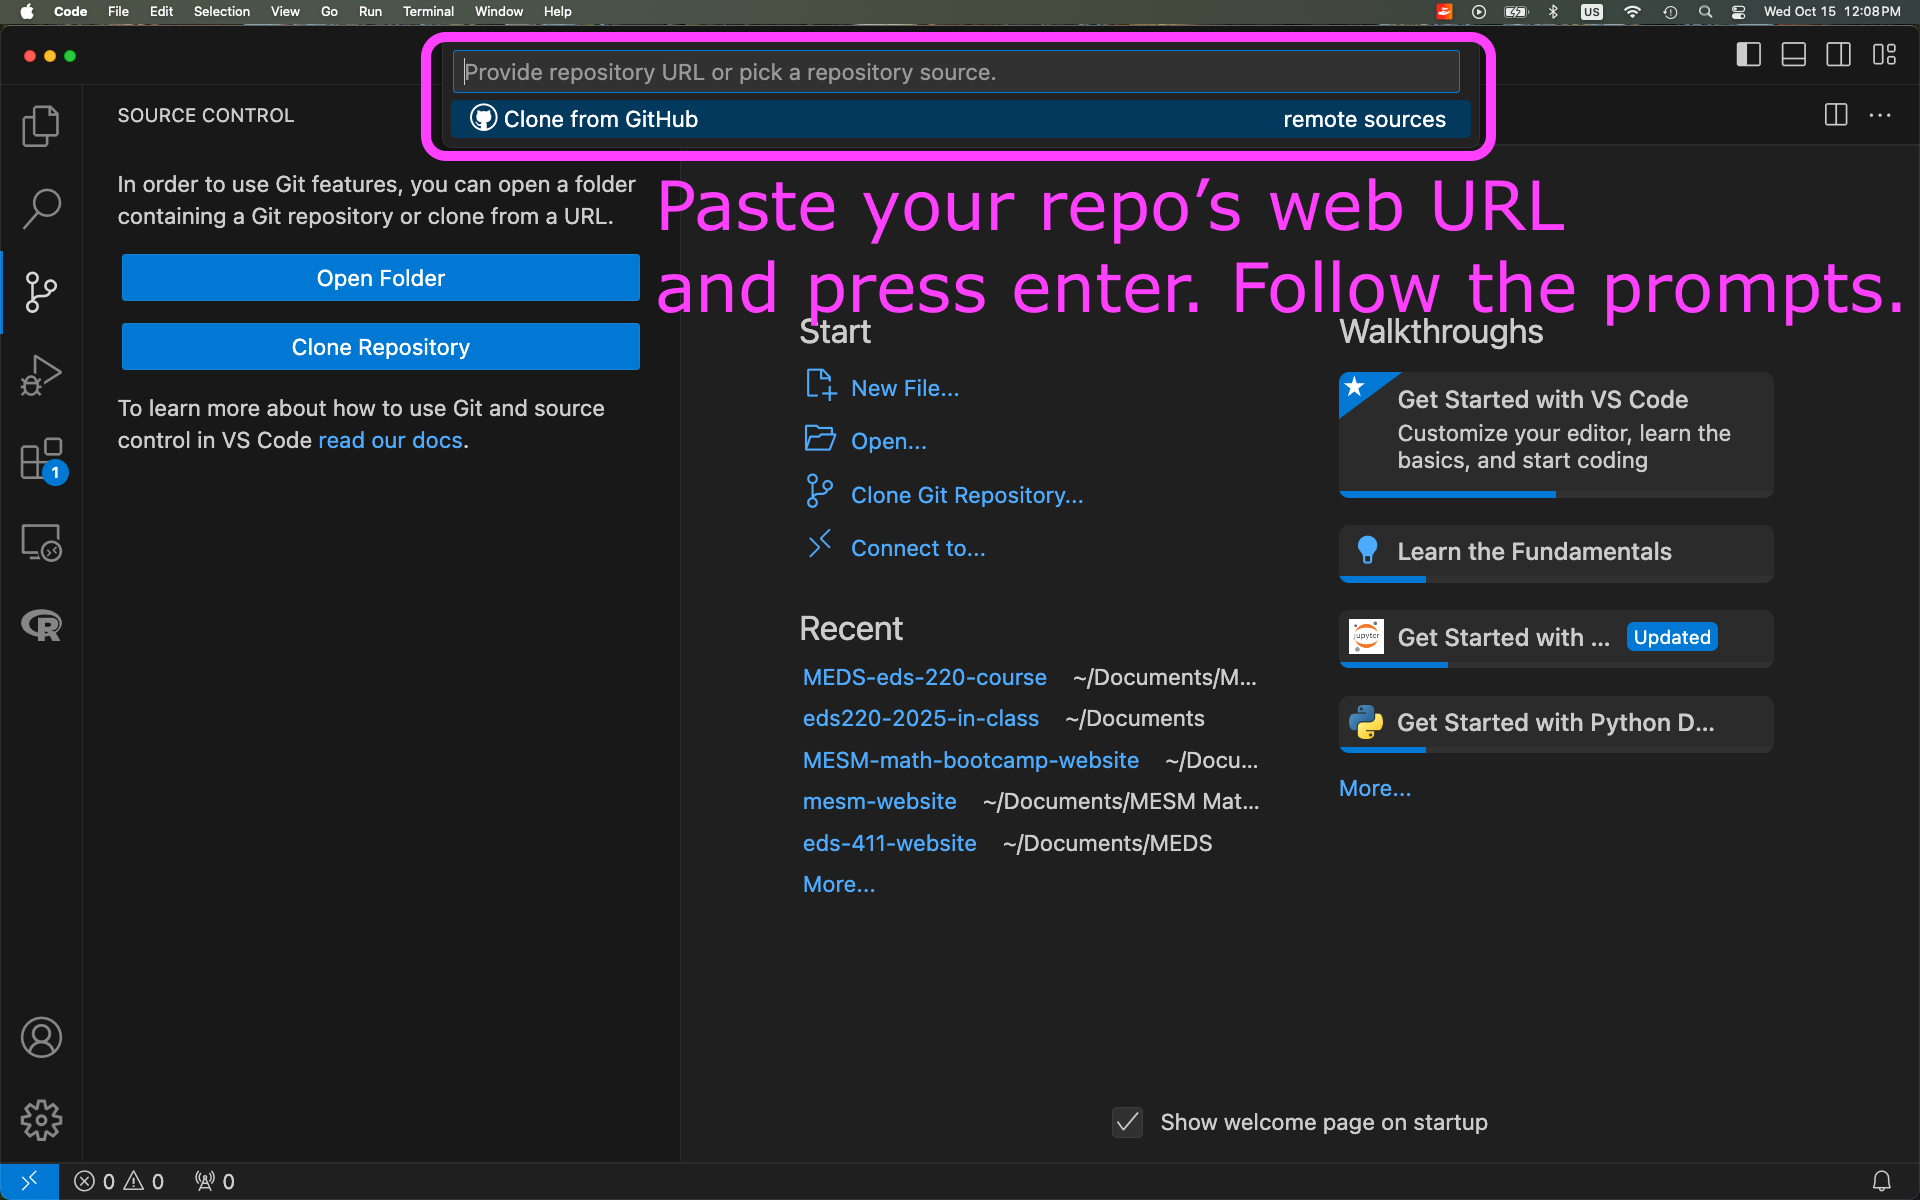
Clone your
eds-220-in-classrepository inside theMEDS/EDS-220directory. You can do this using the terminal or using the VSCode interface:
- Confirm your conda installation by running
conda infoin the terminal. If conda is active you will get something similar to
active environment : base
active env location : /Users/galaz-garcia/opt/anaconda3
shell level : 1

[...]

UID:GID : 502:20
netrc file : None
offline mode : False
If conda needs to be added to the shell profile, follow the troubleshooting steps in the MEDS installation guide within a bash terminal (not Powershell if you are on Windows).
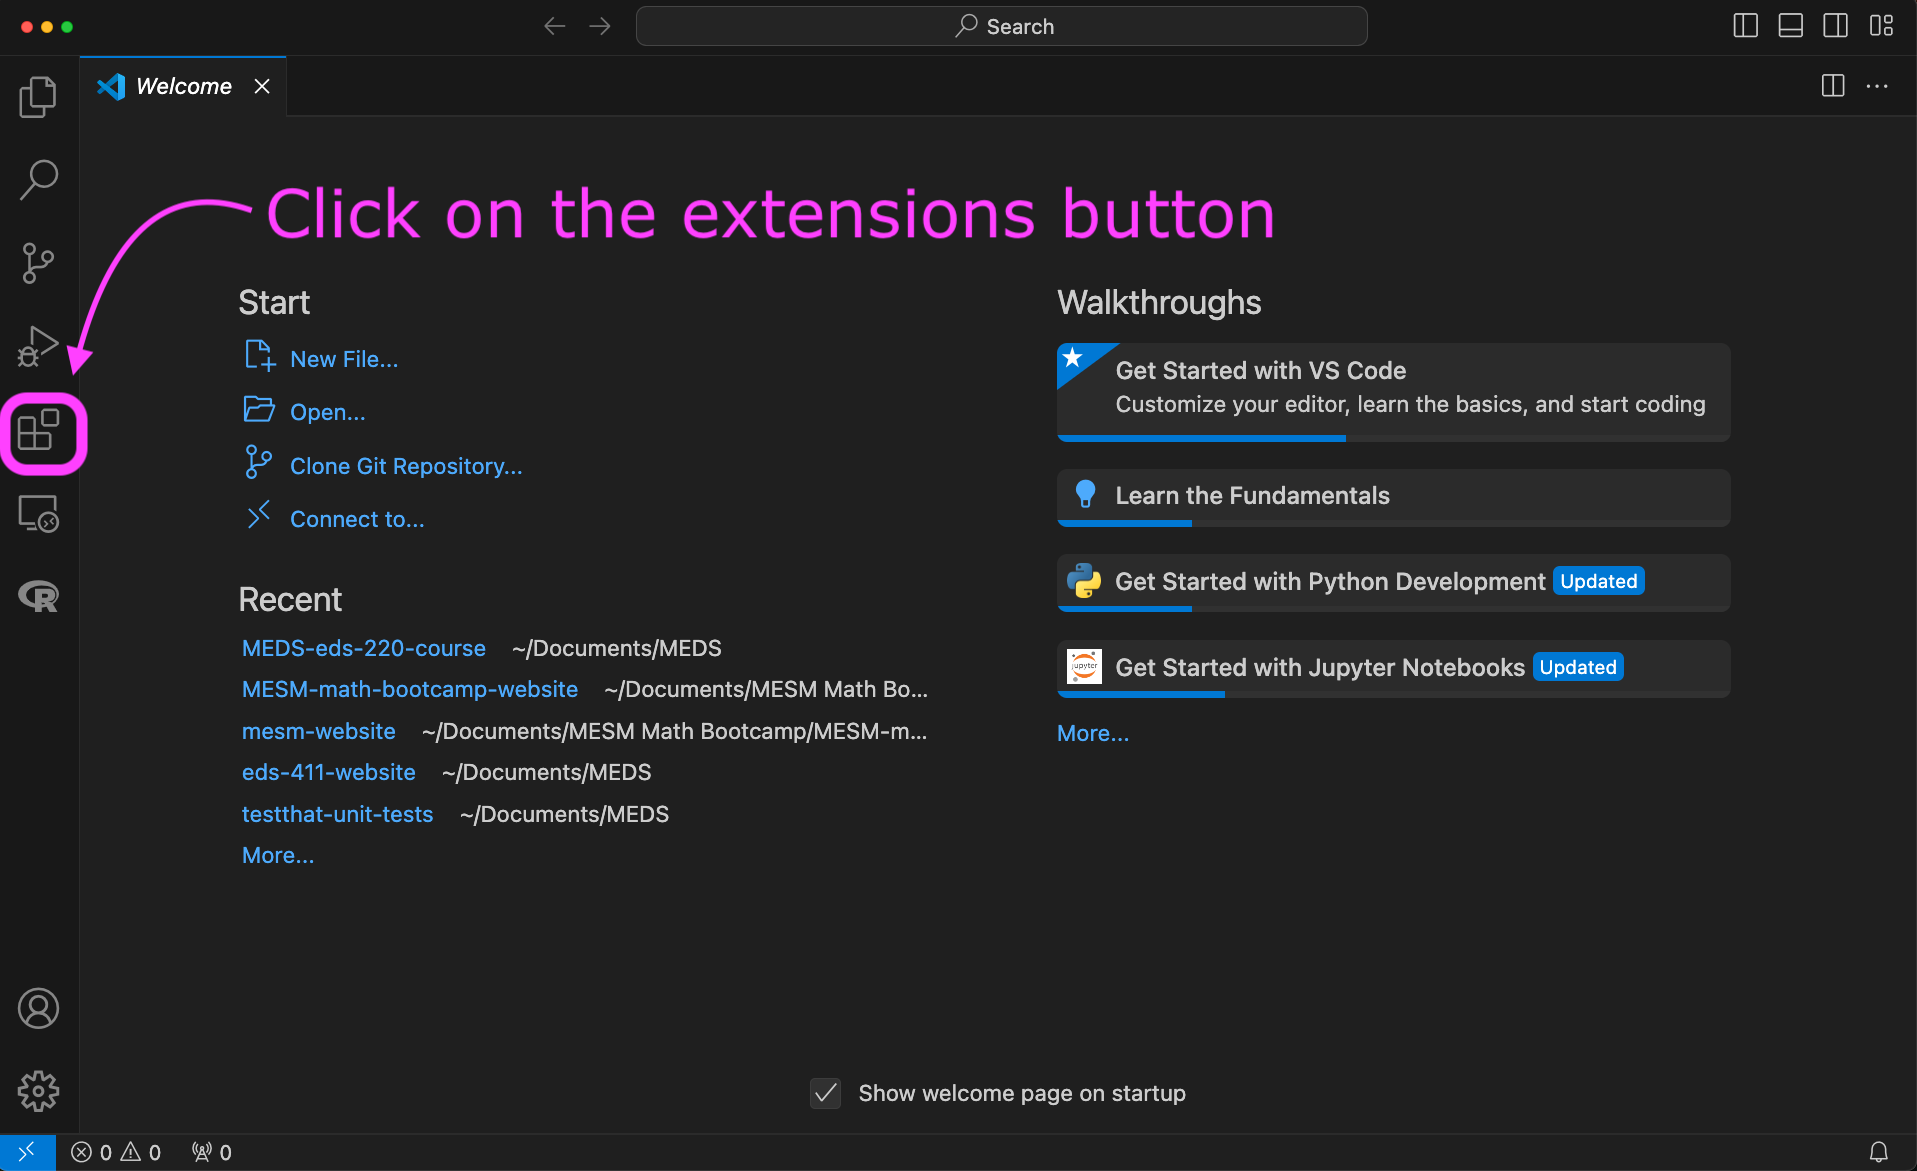
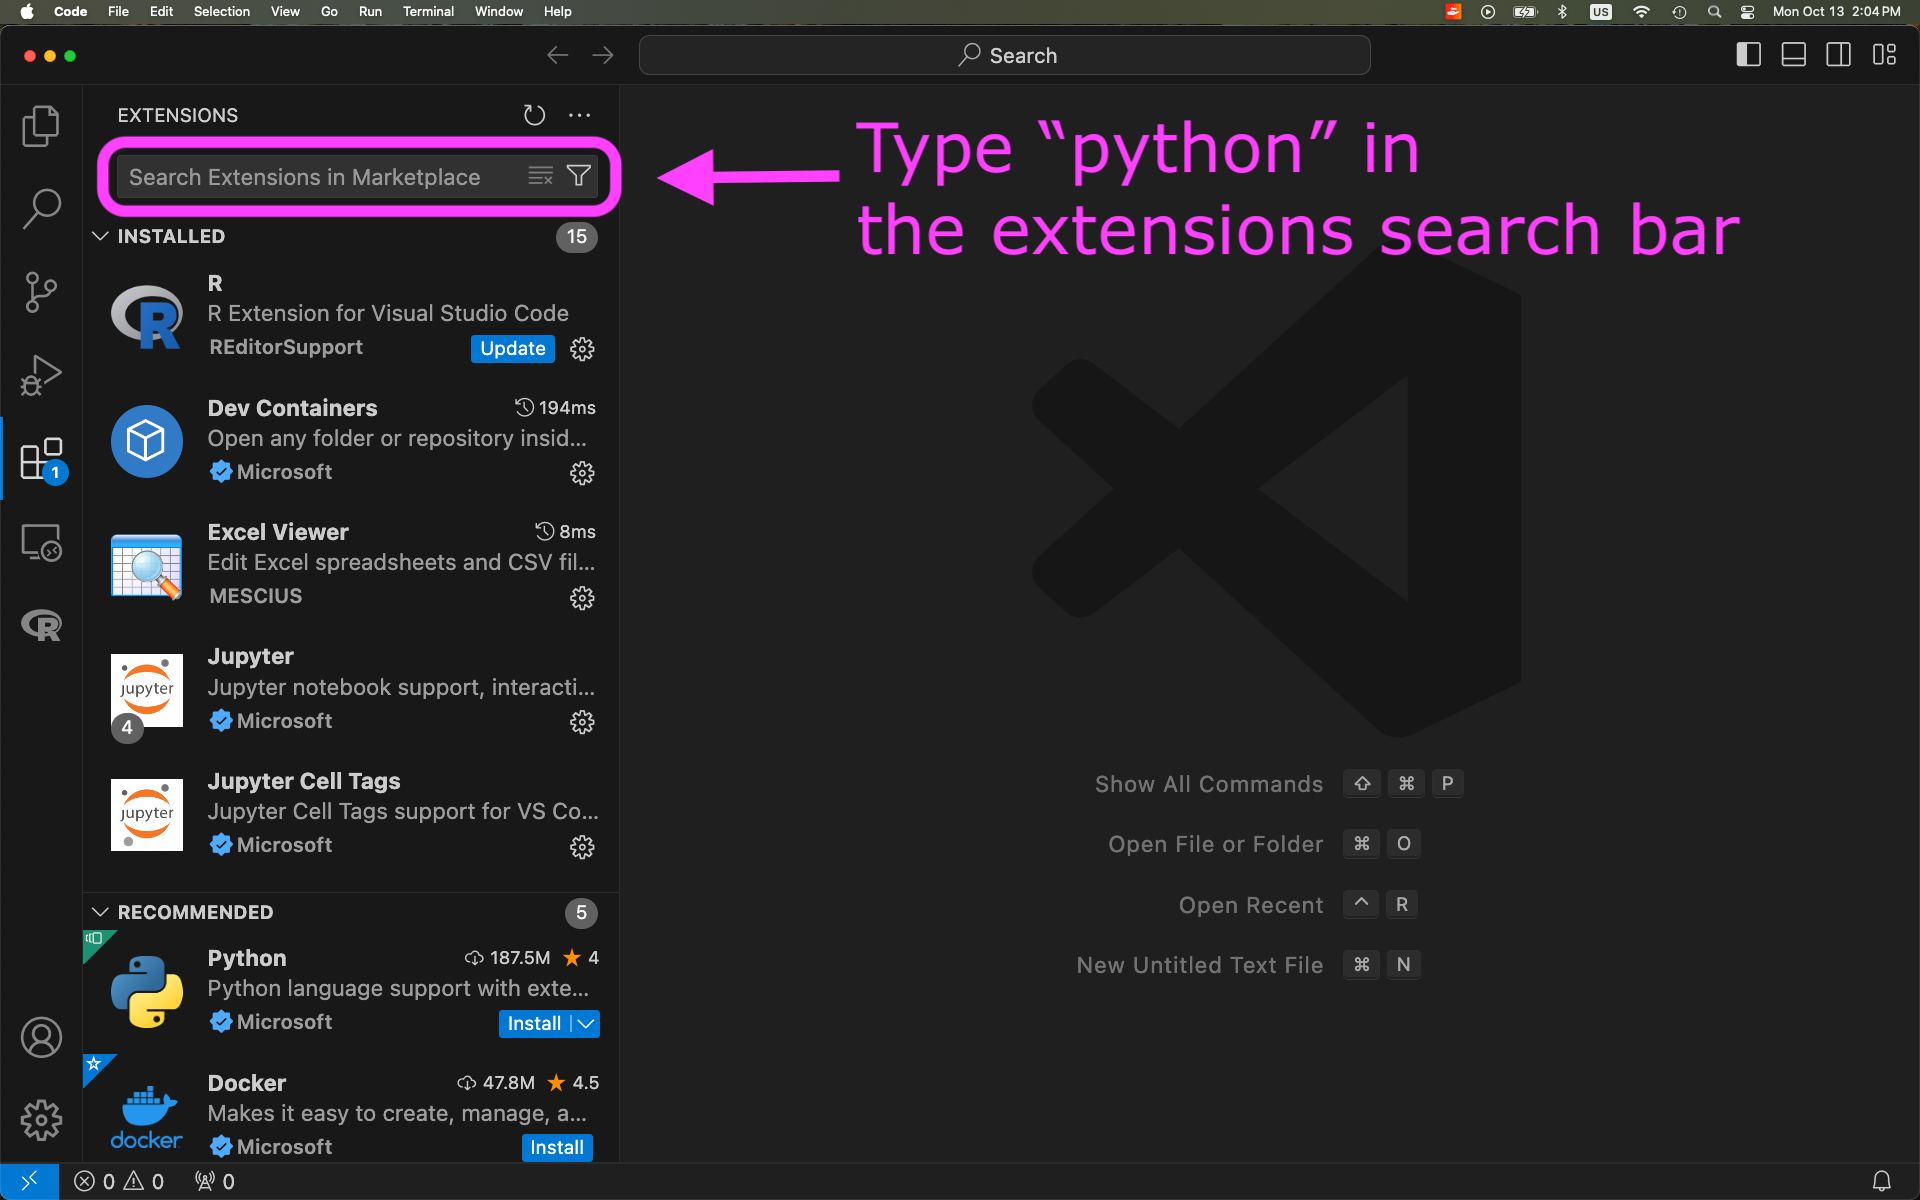
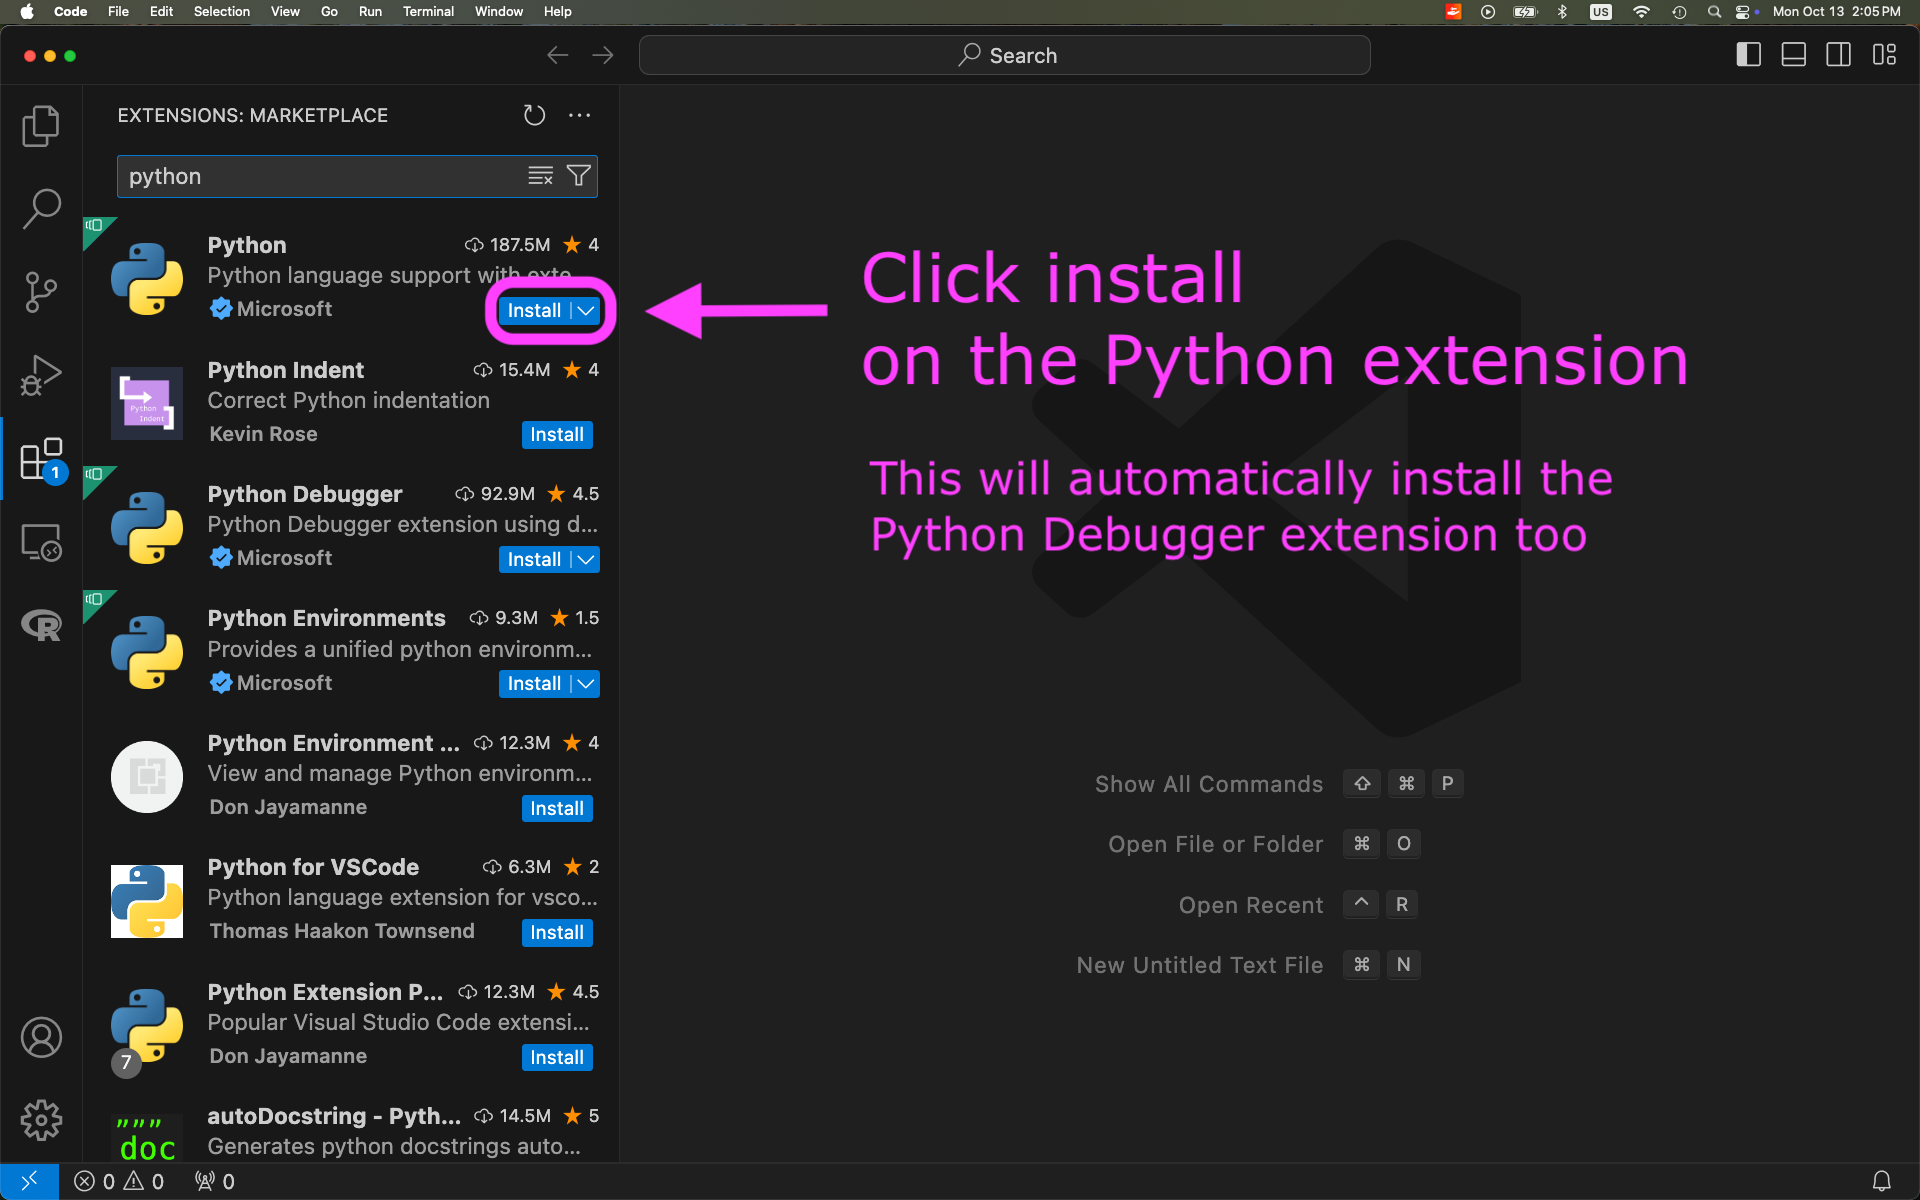
Install Python extension to VSCode:
Class 7 (Thursday)
- Built conda environment for the course on personal computers.
- Covered time series notes @ workbench.
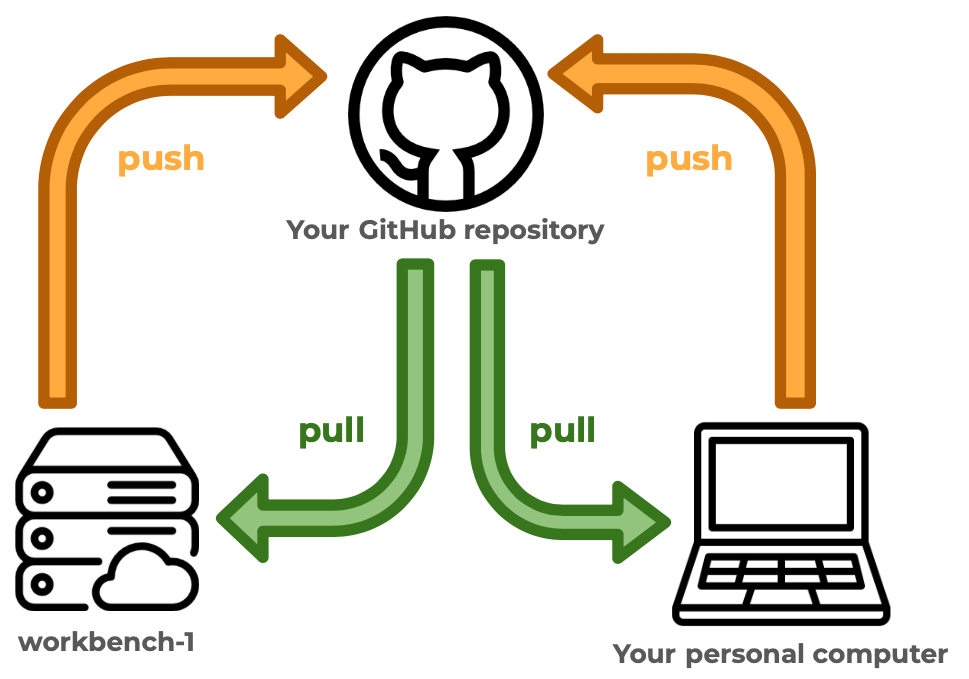
- Reviewed git workflow with personal computer and workbench.
Make sure you have built the eds220-env before creating the kernel.
Open VSCode on your computer.
Add a new bash terminal in it.
Verify you have the
eds220-envconda environment available by running
conda env list- Activate the
eds220-envby running
conda activate eds220-envVerify the environment has been activated.
Run
python -m ipykernel install --user --name eds220-env --display-name "EDS-220 env"- Verify that the kernel has been created by running
jupyter kernelspec listThe output should look similar to this:
Available kernels:
  eds220-env        /Users/galaz-garcia/Library/Jupyter/kernels/eds220-env
  python3           /Users/galaz-garcia/opt/anaconda3/share/jupyter/kernels/python3
Close and reopen VSCode.
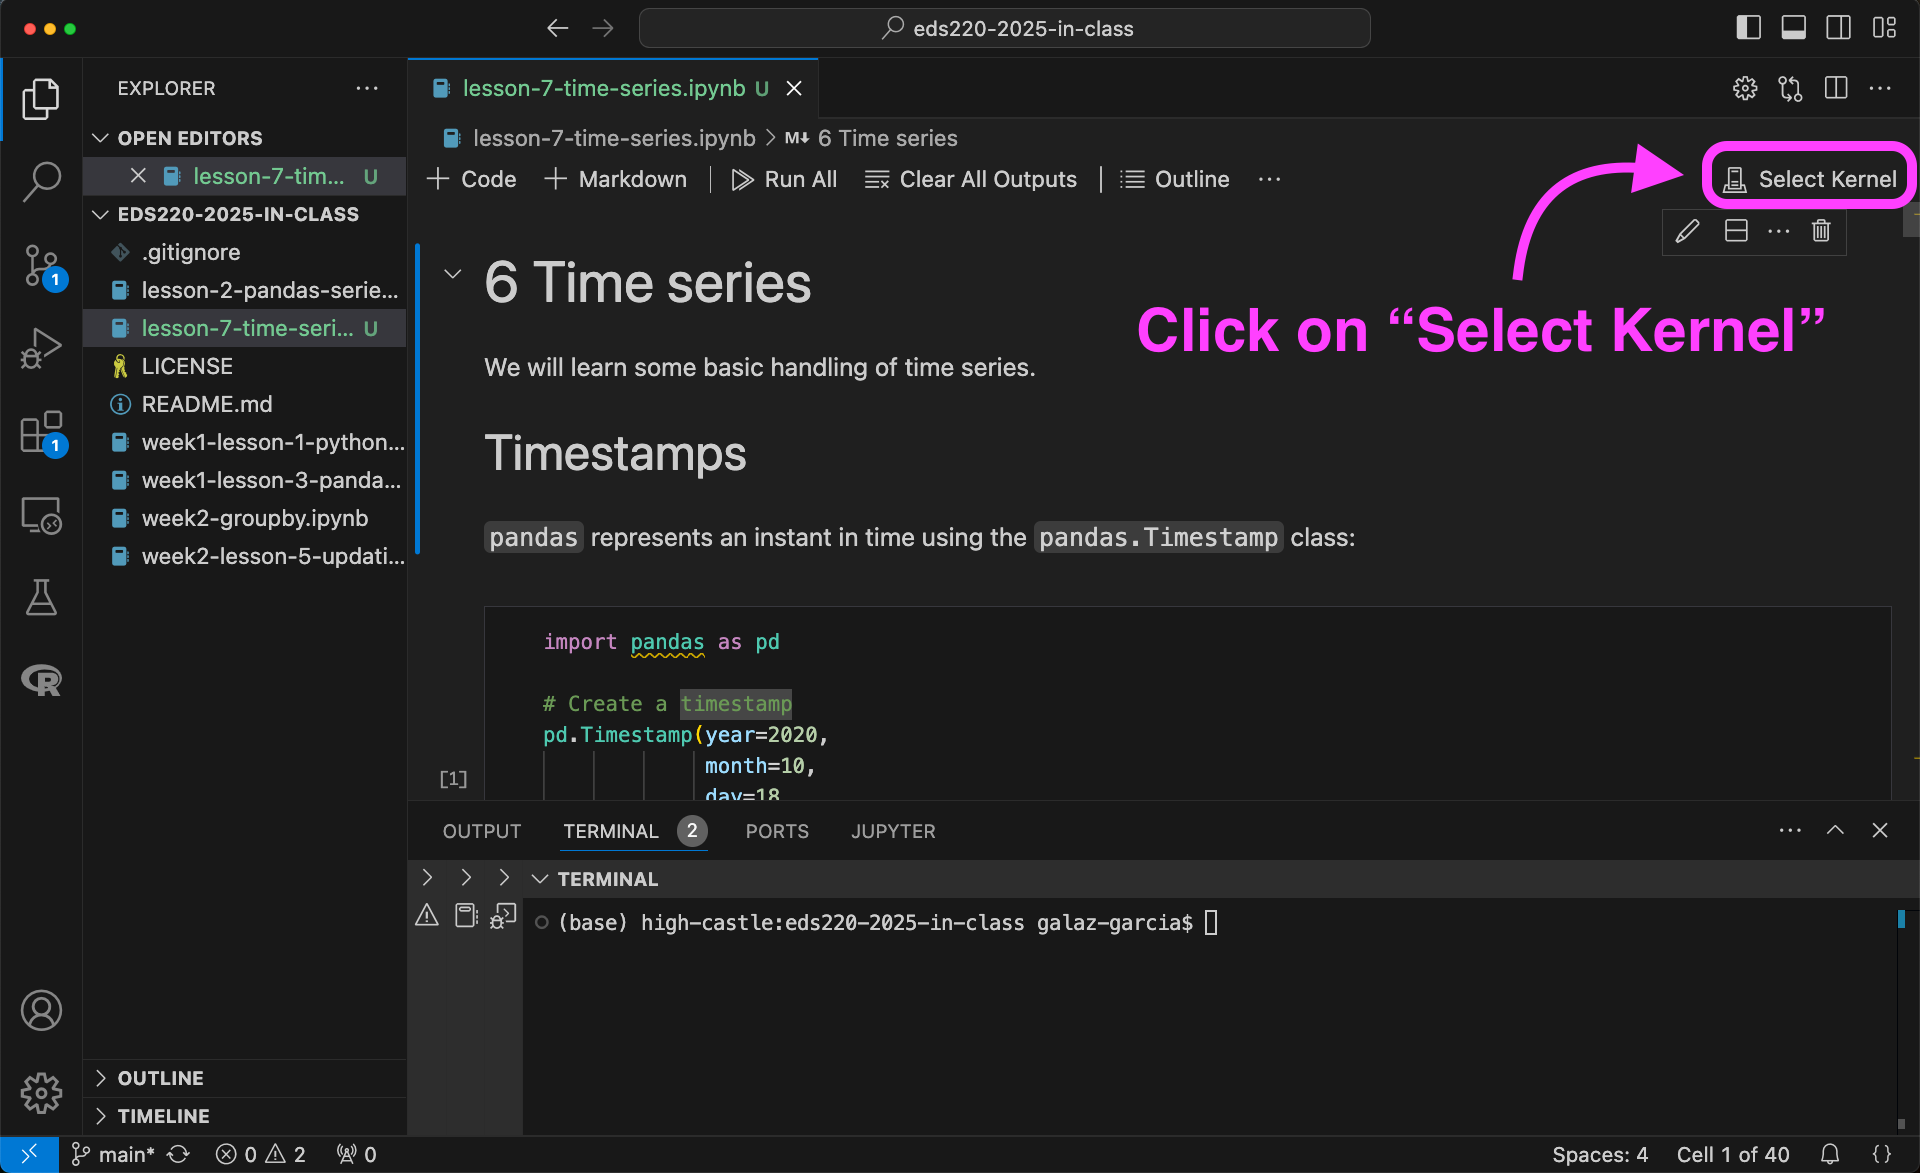
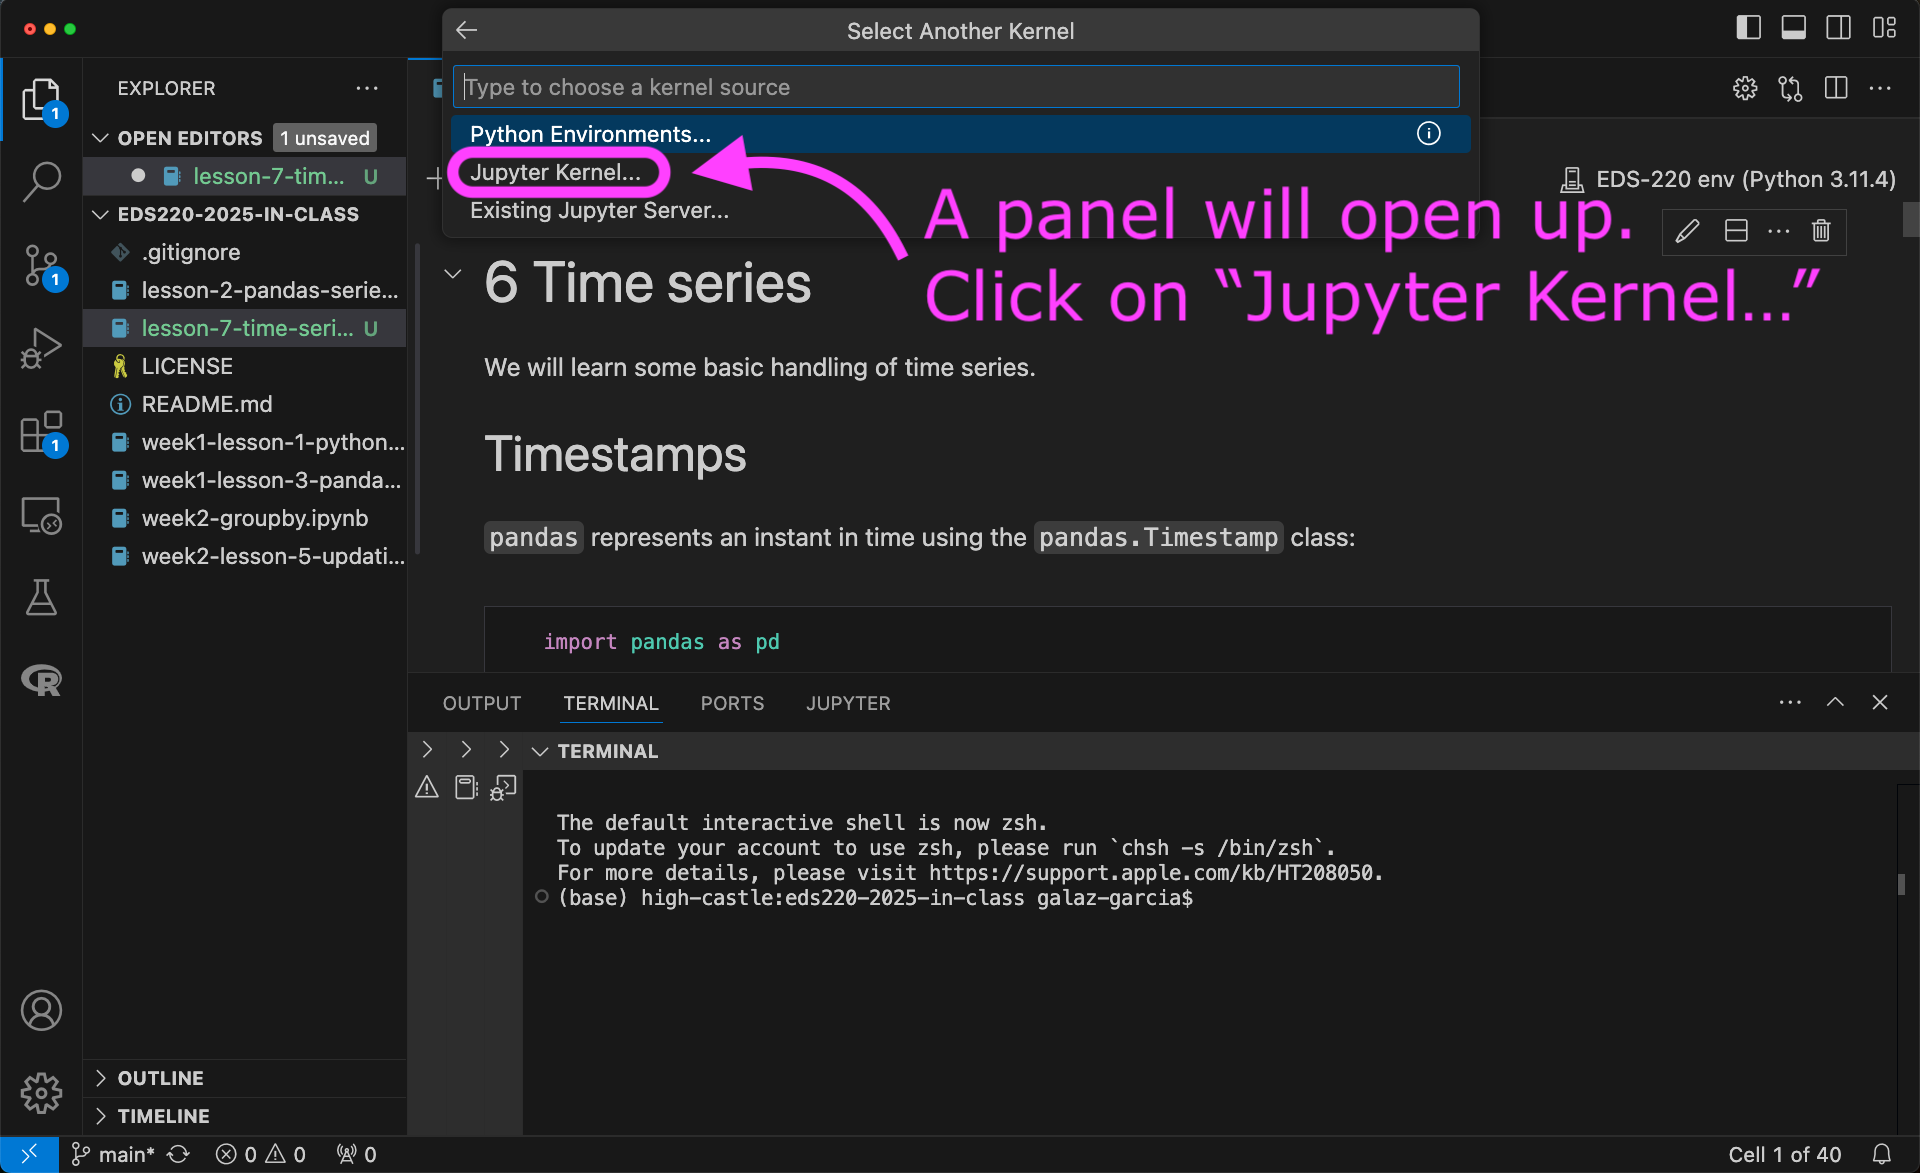
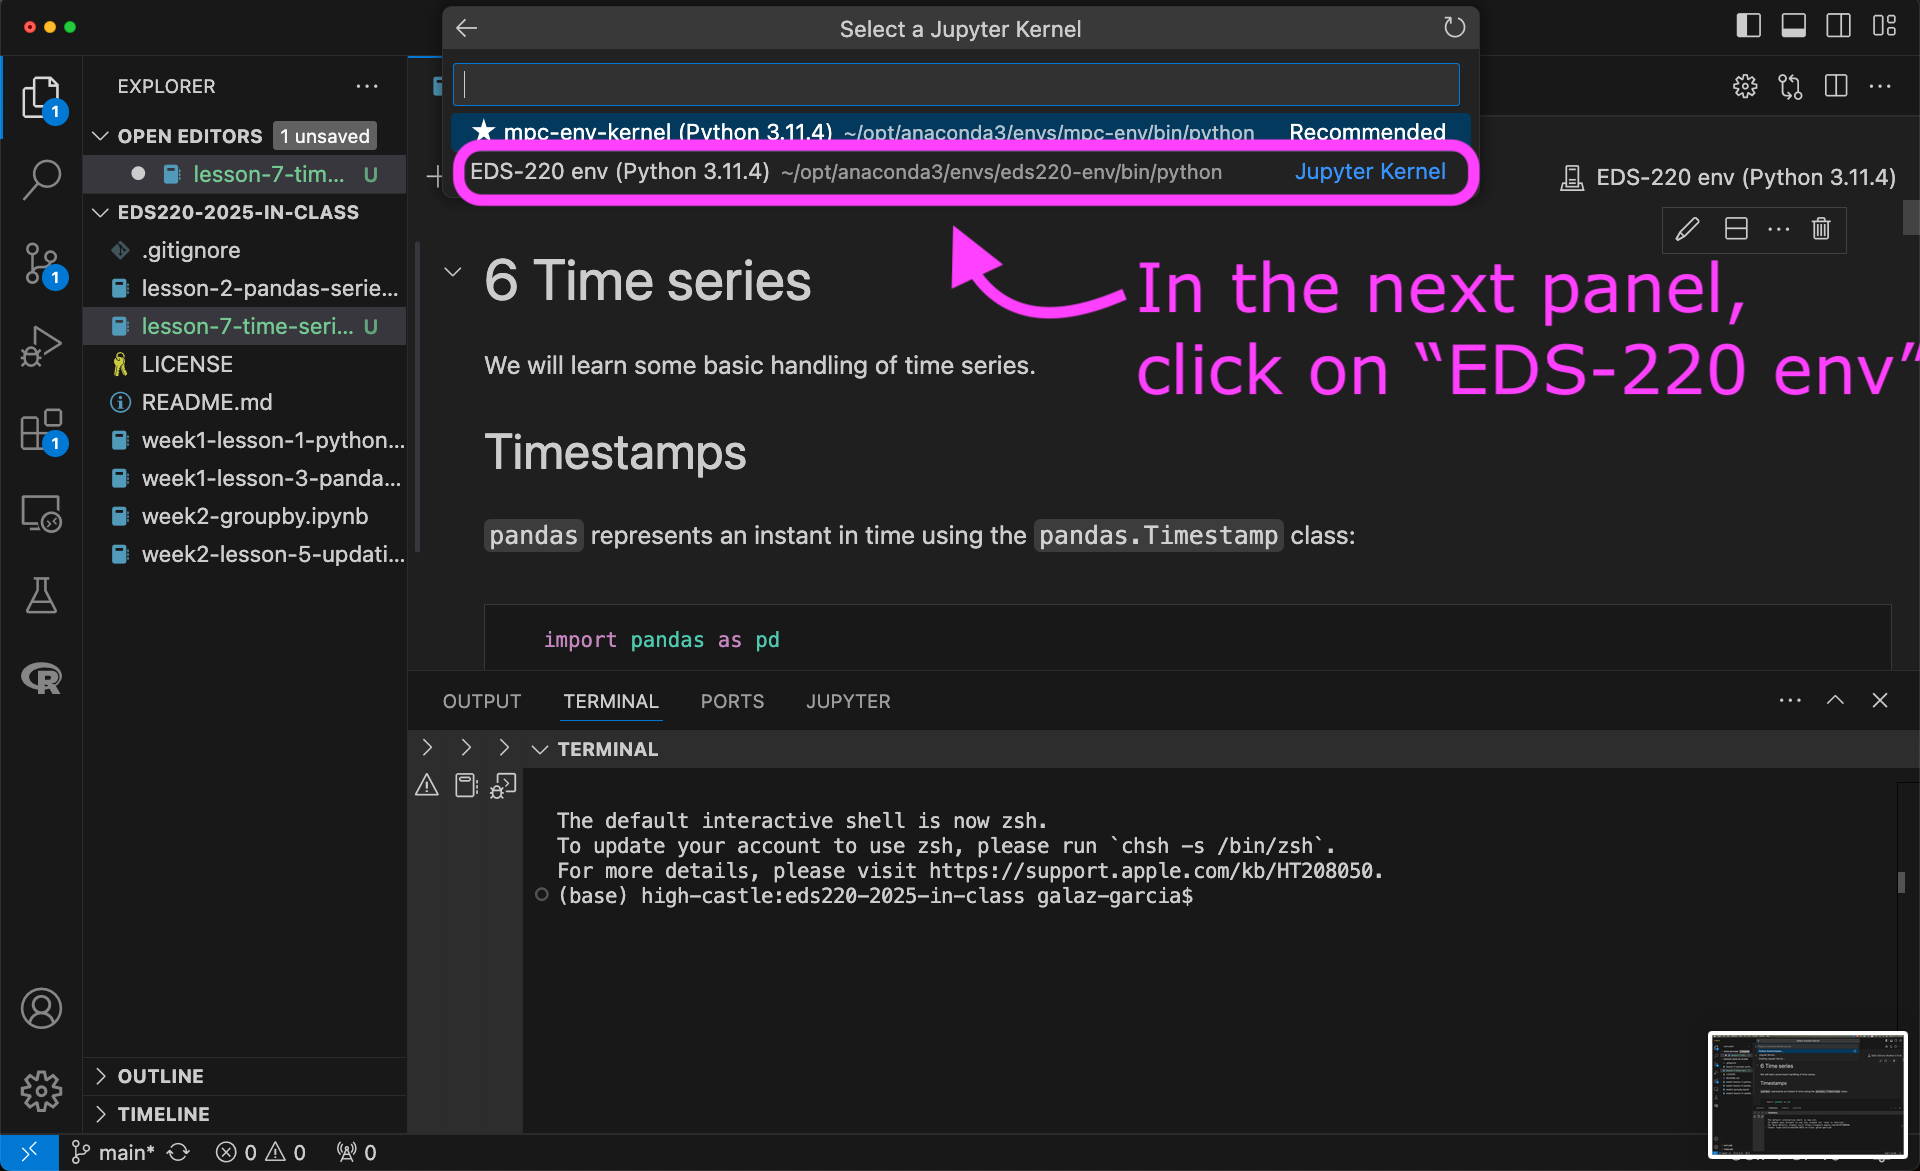
To use the new kernel, open a Jupyter notebook on VSCode and…
Discussion section (Friday)
Week 4 : Oct 20 - Oct 26
Week 5 : Oct 27 - Nov 2
Week 6 : Nov 3 - Nov 9
Class 11 (Tuesday)
- Covered functions and exercises
Exercise 1
Create a function called power_source_counts that, given a power source, returns a Series with the counts of power plants by state that use that source.
Follow the steps:
- solve the problem for a specific example (e.g., ‘wind’)
- identify which parts of the code need to be generalized and update these parts
- wrap this into a function
- add additional parameters or assert statements if needed
Exercise 2
- Recreate the following plot.
- Make a function that produces this plot for any power source.
- Brainstorm ways in which your function might break or not produced the desired output.

Bonus Create a function that, for a given power source, produces a plot like this one. Many ways of doing it, a hint could be to zip three things together: the axes, the top 3 states, and the counts of power plants in those states.
# Example of more than two zipped items

for a, b, c in zip([1,2,3], ['x','y','z'], [10,20,30]):
    print(a, b, c)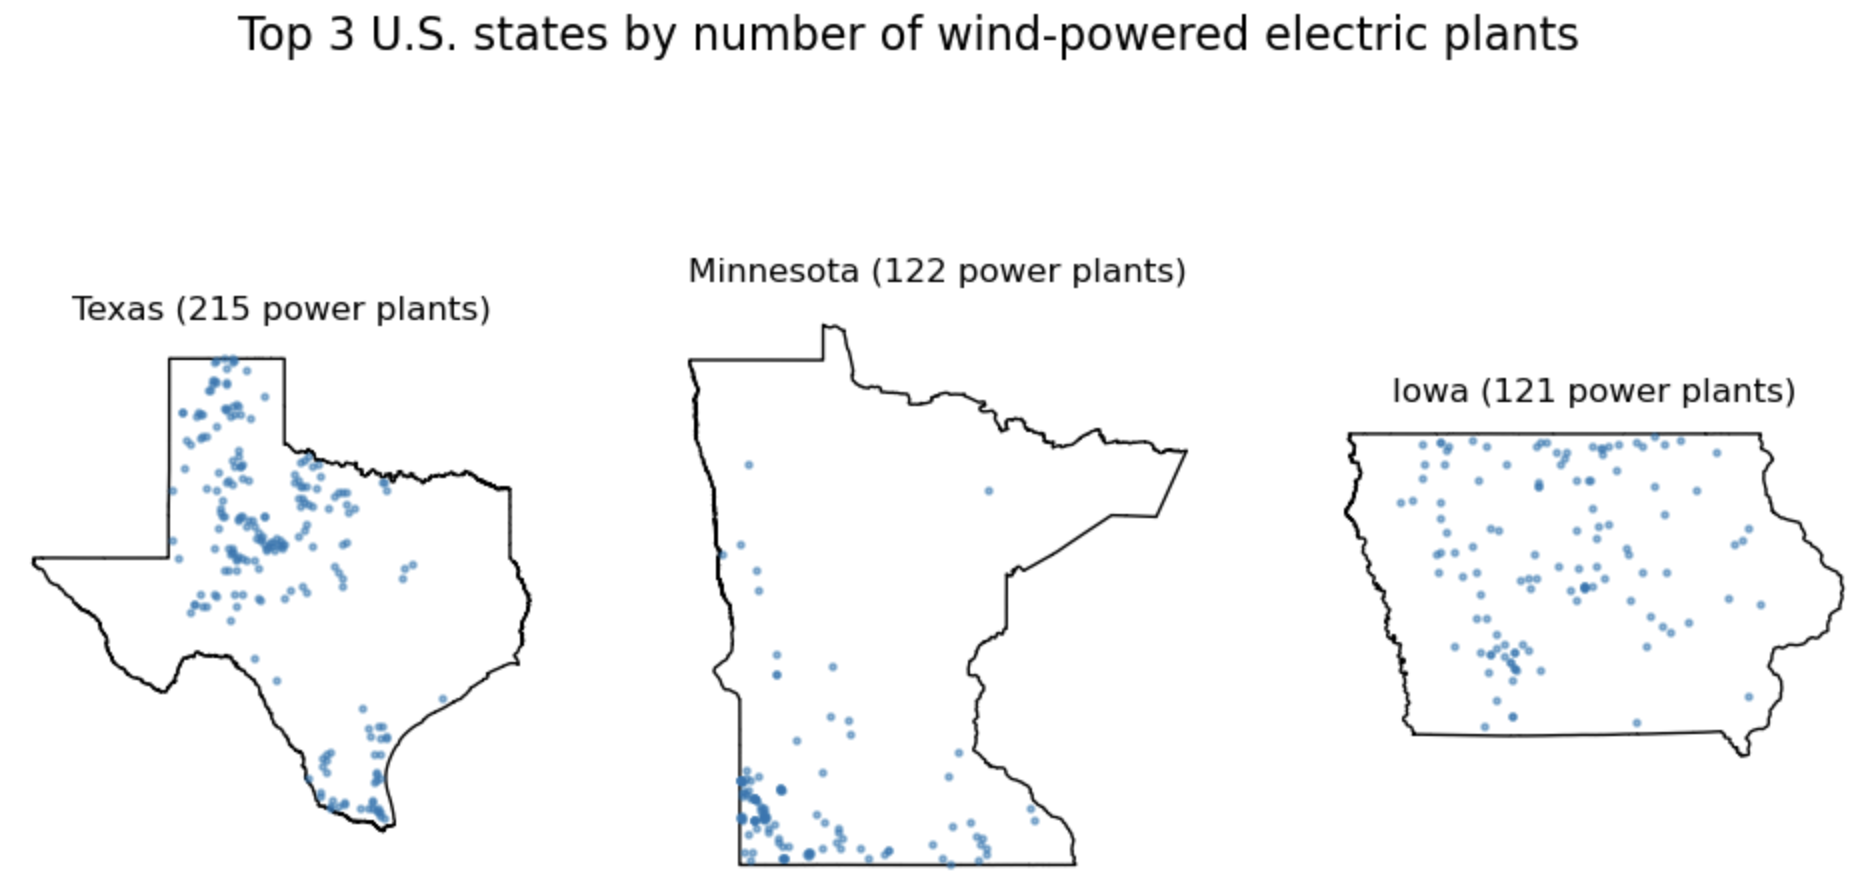
Class 12 (Thursday)
- Covered the reprojecting notes.
Discussion section
We’ll be using a fairly big dataset so we’ll work on the workbench where this data has already been stored.
You can work directly on the workbench or you can practice using VSCode to SSH into workbench-1.
If you decide to SSH into workbench-1, practice before discussion section and make sure you can run a notebook (any) from your in-class directory.
Week 7 : Nov 10 - Nov 16
Week 8: Nov 17 - Nov 23
Week 9: Nov 24 - Nov 30
Week 10: Dec 1 - Dec 7
Course evaluations
You will receive a emails to complete the MEDS course evaluations shortly. These include two surveys for Annie and one for me. Please:
1️⃣ Evaluate Annie’s teaching for EDS 220 in the “EDS 220 - Professor Adams survey”
2️⃣ Evaluate Carmen’s teaching for EDS220 in the “EDS 220 - Professor Galaz García survey”
3️⃣ Evaluate Annie’s teaching for EDS 223 in the “EDS 223 - Professor Adams survey”
You can double-check which survey you’re on at the top. Thank you for completing the surveys!
