Plotting geospatial data with git branching
Week 5 - Discussion section
🎃 Happy Halloween! 🎃
In this discussion section you will wrangle data about earthquakes and practice:
- Breaking down a question into accessible data wrangling steps
- Importing and plotting different types of geospatial data
- Finding additional guidance online to carry out your data wrangling plans
- Git branching and pull requests with a partner
Setup
General directions
About the data
For this task you will use two datasets.
The first dataset is simplified data from the USGS Earthquakes Database. This data is in tabular format and has the following columns:
| Column | Description |
|---|---|
| time | date and time of event (all events from 2014) |
| latitude | decimal degrees [-90,90] |
| longitude | decimal degrees [-360,360] |
| depth | depth of the event (km) |
| mag | magnitude of event |
| id | event identifier |
| place | where the event took place |
| type | type of event |
This is the same dataset you used in assginment 1. You can access the data through this link.
Further information about the dataset can be accessed in the ANSS Comprehensive Earthquake Catalog (ComCat) Documentation.
The second dataset is Natural Earth’s low resolution cultural boundaries data. These are useful to make maps of the whole world, although might not be suitable for mapping individual nations or finer geospatial analysis. You can access the “Admin 0 – Countries” dataset available in this link.
1. Brainstorm
In this session you will recreate the following map:
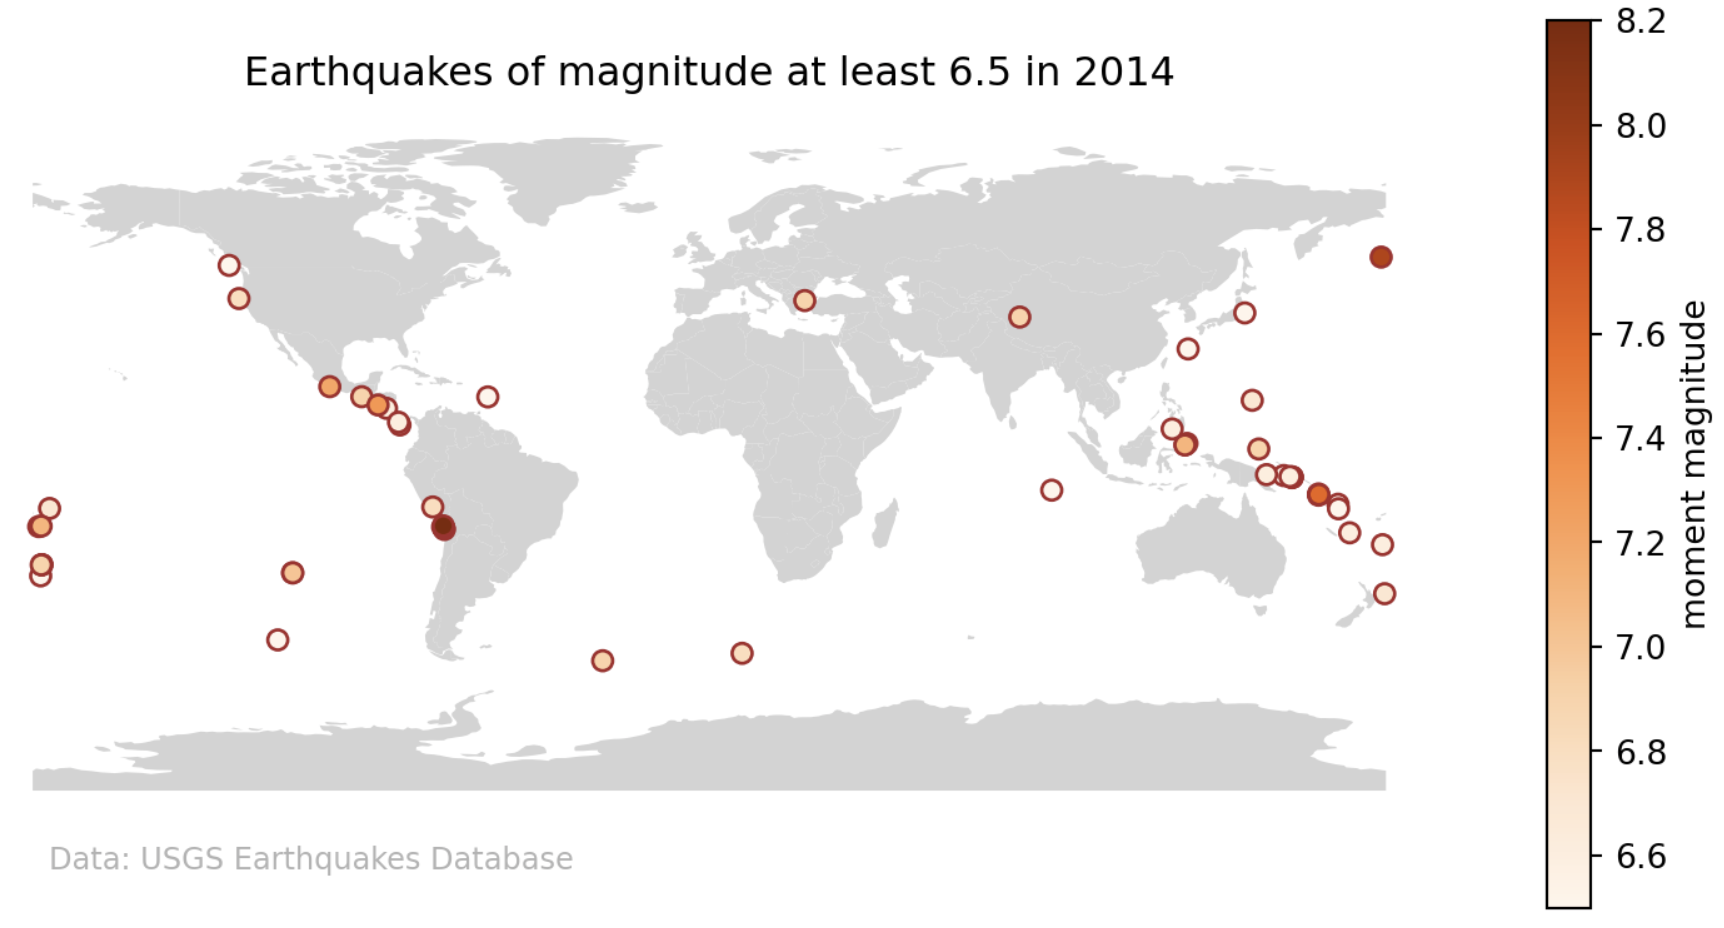
Individually, write down high-level steps on how you would explore and wrangle the data to produce this map. Do not code anything yet.
Discuss your high-level steps with your team. What do you see as potential challenges to implementing your plan?
As a team, select an initial plan for recreating this plot.
2. Create the plot
Use your plan as a starting point to recreate the plot.
You may (or not) need to look online to carry out some of the steps in your plan. It is completely fine to seek help online! Resourceful troubleshooting is a key skill in data science.
It’s ok if your initial plan changes as you work with the data and discuss challenges with your team! This brainstorm is to create a shared starting point.
Don’t forget to write informative commits in the imperative every time you finish a major step.
3. Update your notebook
Include any takeaways from the map in a markdown cell after your plot.
Go over your notebook and add markdown cells with appropriate titles and subtitles to guide the reader through the different steps in your workflow.
Include a markdown cell at the top with a title for your notebook and a description of what it is about.
Branching
It’s time to practice some branching! Creating branches on Github encourages collaboration on Github repos without all the merge conflicts! A branch gives you an isolated environment to make changes without immediatley effecting the main branch.
Partner 2 Tasks
Partner 2
Check your email for the invitation to the earthquake-branching repository your partner added you as a collaborator to. Accept the invitation. Then, clone the
earthquake-branchingrepository to your workbench.Create a new branch to make edits on with the following command in the workbench terminal. This command is creating a new branch and calling it
partner2-branch(be sure to update “partner2” with Partner #2’s name!)
git checkout -b partner2-branch- Double check that you are on your new branch. Run the following code in the terminal. If it returns an asterik (*) next to your new branch name, you are on your new branch!
git branchOutput:
- Set the upstream remote branch
Before pushing, you need to set the upstream branch! This sets up a tracking relationship between your local branch and your remote branch. You will only need to set this up once for each individual branch you make!
--set-upstream origin partner2-branch- Make the following changes on your new branch:
- Follow the documentation for
plt.figtextto add your name as an author on this plot in the bottom right corner.
- Push your changes!
Run git pull to make sure you have the most up to date remote changes. Then run git push.
Where did you just push your changes to? Where do you need to go to check the changes you just made on your remote repository?
- Create a pull request!
You now have a branch called main that has the plot you and your partner created. You also have a branch called partner2-branch that has updated colors and Partner #2’s name as an author. We want to merge the changes from this partner2-branch into our main branch. To do so, we will create a pull request.
- Navigate to the remote repository on github.com
- Click on the pull request icon
- Click “New Pull Request”
- In the compare changes tab, merge your branch into the main branch

- Click “Create Pull Request”
- Github will compare your branch with main and make sure there are no conflicts. If there are no conflicts, a “Merge pull request” option will appear. Click on this!
- Write a commit message that encompasses the changes you are merging into the main branch
- Finally, click “Confirm Merge”. You have just merged your branch into main!!!
Partner 1 Tasks
Partner 1
Partner 1 will now follow a similar sequence of tasks, with a very important addition! The remote repository now contains changes from your parnter that you do not have locally. You need to do a git pull to avoid merge conflicts!
In ther workbench terminal, run
git pullto make sure you have all changes that your partner made locally.Create a new branch to make edits on with the following command in the workbench terminal. This command is creating a new branch and calling it
partner1-branch(be sure to update “partner1” with Partner #1’s name!)
git checkout -b partner1-branch- Double check that you are on your new branch. Run the following code in the terminal. If it returns an asterik (*) next to your new branch name, you are on your new branch!
git branchOutput :

- Set the upstream remote branch
Before pushing, you need to set the upstream branch! This sets up a tracking relationship between your local branch and your remote branch. You will only need to set this up once for each individual branch you make!
--set-upstream origin partner1-branch- Make the following changes on your new branch:
- Follow the documentation for
plt.figtextto add your name as an author on this plot in the bottom right corner.
- Push your changes!
Run git pull to make sure you have the most up to date remote changes. Then run git push.
Where did you just push your changes to? Where do you need to go to check the changes you just made on your remote repository?
You now have a branch called main that has the plot you and your partner created. You also have a branch called partner1-branch that has Partner #1’s name as an author. We want to merge the changes from this partner1-branch into our main branch. To do so, we will create a pull request.
- Navigate to the remote repository on github.com
- Click on the pull request icon
- Click “New Pull Request”
- In the compare changes tab, merge your branch into the main branch
- Click “Create Pull Request”
- Github will compare your branch with main and make sure there are no conflicts. If there are no conflicts, a “Merge pull request” option will appear. Click on this!
- Write a commit message that encompasses the changes you are merging into the main branch
- Finally, click “Confirm Merge”. You have just merged your branch into main!!!